
Quick Answer: A Ryobi 40V battery that won't charge is usually caused by a deeply discharged cell (below the charger's detection threshold), faulty battery contacts, a defective charger, or triggered thermal protection. In most cases, you can revive it by cleaning contacts, performing a "wake-up" charge with a compatible method, or identifying and replacing a bad cell. Full diagnosis takes 20–40 minutes.
There's a particular kind of frustration that comes with a dead Ryobi 40V battery. It's not like a flat tire — the problem is invisible. The battery looks fine. The charger looks fine. You plug it in, and either nothing happens, or you get a blinking red light that the manual describes with exactly three words of explanation before directing you to a toll-free number that puts you on hold for forty-five minutes.
The Ryobi 40V platform — which spans lawn mowers, chainsaws, and leaf blowers — has accumulated a massive user base, much like how specialized guides have become essential for troubleshooting other complex systems or managing smart home appliances. The batteries themselves are lithium-ion packs ranging from 2Ah compact units to 12Ah high-capacity bricks, and they share a charging architecture that is simultaneously more sophisticated and more fragile than most users realize.
This guide is not going to tell you to "try a different outlet," as true technical issues often require deeper investigation, similar to resolving Wi-Fi packet loss or dealing with HDMI handshake failures. This is a real diagnostic walkthrough — the kind that covers what's actually happening inside the pack, why the charger refuses to engage, and what options you have that don't involve immediately buying a $120 replacement.
Understanding Why the Ryobi 40V System Fails to Charge
The Battery Management System: Your First Suspect
Every Ryobi 40V lithium-ion battery contains a Battery Management System (BMS) — a small circuit board that monitors cell voltage, temperature, current flow, and charge cycles. The BMS is what makes modern lithium batteries relatively safe. It's also what makes them incredibly annoying to troubleshoot.
The BMS will refuse to allow charging under several conditions, a protective logic sequence comparable to the software safeguards found in high-end displays or advanced HVAC controllers.
- Individual cell voltage drops below approximately 2.5V (the threshold varies slightly by generation)
- Pack temperature is outside the acceptable range (typically 32°F–104°F / 0°C–40°C)
- The BMS detects an internal fault or imbalanced cells
- The BMS has entered a deep sleep state due to prolonged discharge
This last condition — deep sleep — is responsible for a disproportionate number of "my battery is dead" complaints on forums like Reddit's r/ryobi, Home Depot's product review pages, and the dedicated Ryobi Nation community boards. When a lithium-ion cell drops below roughly 2.5V per cell, the BMS enters a protection state and essentially locks itself. The charger sees the pack voltage, determines it's too low for its safety thresholds, and refuses to initiate the charge cycle.
The charger isn't broken, just as a stalling espresso grinder or an unresponsive robotic vacuum often only requires specific troubleshooting steps rather than total hardware replacement. The battery isn't necessarily dead. But neither will cooperate.
"I left my 40V 6Ah pack in the garage all winter. Spring comes, plug it in, nothing. Red blink. Thought it was toast. Turns out the BMS just needed a kick. Fixed it in 20 minutes with a 12V trickle trick. These things are not as dead as they look." — User comment, Ryobi Nation forum thread "40V battery won't charge after storage," archived discussion

Charger Behavior: What the Lights Are Actually Telling You
The Ryobi 40V charger uses an LED indicator system that is under-documented, a common frustration for users who also struggle with undocumented display artifacts or mysterious black screen issues. Here's what the light patterns actually mean in practice, based on observed behavior and teardown reports from the community:
| LED Pattern | What It Likely Means |
|---|---|
| Solid green | Battery fully charged or charger in standby |
| Solid red | Charging in progress |
| Slow blinking red | Battery too hot or too cold — thermal pause |
| Fast blinking red | Battery fault, extreme low voltage, or BMS lockout |
| Red + green alternating | Defective battery or incompatible pack |
| No light at all | No power to charger, bad connection, or completely dead charger |
The problem: Ryobi's official documentation doesn't always differentiate between "too hot" and "BMS fault" blinking patterns. The blink rate varies between charger generations, and what constitutes "fast" versus "slow" is subjective enough that users on forums have literally timed the blinks with stopwatches trying to decode them.
This is a real usability failure. The OP403 and OP404 manuals, for instance, describe the LED behavior in a single paragraph. For a $120+ battery pack, this level of diagnostic transparency is genuinely insufficient.
Step-by-Step Diagnostic Process
Step 1: Rule Out the Obvious (Without Insulting Your Intelligence)
Before opening anything up:
Check the charger independently. Plug the charger into a known-working outlet. Does the green standby light come on? If not, the charger itself may be the problem. Try a different outlet, check the GFCI if you're in a garage or outdoor circuit.
Inspect the battery contacts. Look at the gold/copper contact terminals on both the battery and charger. Oxidation, corrosion, grass debris, or even just a light film of oil can interrupt the connection. Use a dry cloth or — carefully — a pencil eraser to clean contact surfaces.
Check for physical damage. A cracked housing, swollen cells (the pack feels puffy or one side bulges), or a dropped battery that rattled internally. If the pack is physically swollen, stop. Do not attempt to charge it. Swollen lithium cells are a fire and chemical hazard. This isn't alarmism — it's chemistry.
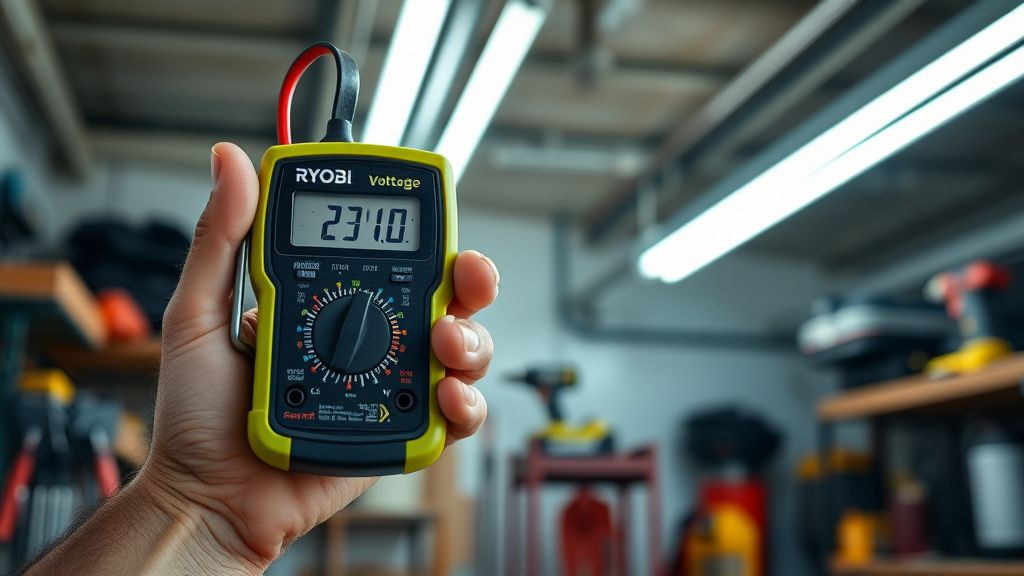
Test the battery voltage with a multimeter. Set your multimeter to DC voltage. Touch the probes to the positive and negative terminals of the battery pack. A healthy 40V battery in storage should read somewhere between 35V and 42V. If you're reading below 25V, the pack has deep-discharged and the BMS is likely in protection mode. Below 15V and individual cells may be damaged.
Step 2: The "Wake-Up" Technique for Deep-Discharged Packs
This is the technique that has revived thousands of batteries that users were ready to throw away. It works because the charger won't initiate a charge cycle on a deeply discharged pack — but if you can manually nudge the voltage up past the charger's detection threshold, the charger will engage and take over from there.
What you need:
- A 12V battery (a car battery, a 12V sealed lead-acid battery, or even a charged 12V tool battery with exposed terminals)
- Two short sections of insulated wire with alligator clips
- Multimeter
- A watch or phone timer
The process:
- Identify the positive and negative terminals on your Ryobi 40V pack. The positive terminal is usually the larger contact or marked with a
+symbol. Some packs have a dedicated communication pin — avoid this. - Connect positive-to-positive and negative-to-negative between your 12V source and the dead Ryobi pack.
- Wait 3–5 seconds maximum. You're not trying to charge the pack with the 12V source — you're trying to briefly raise the pack voltage enough to wake the BMS.
- Disconnect and immediately place the Ryobi pack in your Ryobi charger.
- If the BMS has been successfully woken, the charger should now recognize the pack and begin charging (solid red light).
Critical caveats:
- Do not leave the 12V connection in place for more than 5–10 seconds
- This technique works on packs where cells are still structurally intact but voltage-depleted — it won't fix a pack with genuinely failed cells
- If you see sparking, smell burning, or feel the pack get warm during the 12V connection, disconnect immediately
- This is a community-discovered technique. It works in practice for many users but represents a use case outside Ryobi's official support parameters
"Did the 12V trick on a 5Ah pack that had been sitting since before COVID. Worked. Charged to full, ran the mower for a whole season. Still using it." — Reddit user u/mowermonkey, r/lawncare thread, 2022
Step 3: Contact Cleaning — The Underrated Fix
A surprising number of charging failures come down to contact quality. The Ryobi 40V battery slides into its charger on a rail system, and the spring-loaded contacts can accumulate debris, develop surface oxidation, or lose spring tension over time.
Cleaning procedure:
- Use a cotton swab lightly dampened with isopropyl alcohol (90%+) on the battery contacts
- For the charger contacts, use a dry swab or a folded piece of fine-grit sandpaper (320 grit or higher) very lightly applied
- Look for green or dark discoloration on the copper contacts — this is oxidation
- Ensure the spring-loaded contacts in the charger actually spring back after being depressed. Worn springs are a known failure point on older chargers, especially the OP401 generation
The spring contact issue is particularly common on chargers that have been stored in outdoor sheds through temperature cycles. The springs lose tension. The battery doesn't seat with enough contact pressure. The charger gets an intermittent or absent signal and either refuses to charge or charges erratically.
This failure mode is almost never mentioned in official documentation. It appears repeatedly in Amazon review threads and the r/ryobi subreddit: "New battery, same charger, works fine. Old battery, same charger, won't charge. Cleaned the contacts on the old battery and it works again."
Step 4: Temperature — The Silent Culprit
The Ryobi 40V BMS has a thermal protection circuit. If the battery is too cold (below approximately 40°F / 4°C) or too hot (above approximately 113°F / 45°C), the charger will refuse to charge and typically display a slow blinking red LED.
This catches people off guard in two specific scenarios:
Winter/cold storage: A battery left in an unheated garage overnight in January may be at 20°F when you try to charge it. Bring it inside, let it sit at room temperature for 1–2 hours, then try again. This is not a bug — it's lithium chemistry. Charging a cold lithium cell causes lithium plating on the anode, which is irreversible and can cause short circuits.
After heavy use: Running a Ryobi 40V mower through a large lawn on a hot day can push battery temperature well above the safe charging threshold. The pack may be too hot to charge immediately after use. Let it cool for 30–45 minutes in shade before placing it on the charger.
The operational failure here is that users don't always know which condition they're dealing with. The blinking light doesn't say "too cold" or "too hot." You're left guessing. Some users, after waiting for the charger to engage in a cold garage, eventually give up and assume the battery is dead. It isn't.

Opening the Pack: When and Whether to Go Deeper
This is where opinions in the DIY community diverge sharply.
The Ryobi 40V battery housing is held together with a combination of Phillips screws and Torx T10 or T15 fasteners (varies by generation and capacity). The packs can be opened. The internal cells are standard 18650 or 21700 lithium-ion cells, accessible and theoretically replaceable.
Arguments for opening and attempting cell replacement:
- Replacement cells (Samsung 30Q, Molicel P26A, etc.) cost $5–$15 per cell from reputable suppliers
- A 5Ah 40V pack contains roughly 10 cells in a series/parallel configuration
- Users on YouTube channels like "Project Farm" and "DIY with Dave" have documented successful cell replacements
- The financial case is compelling — a new OEM 5Ah pack retails at $100–$150
Arguments against DIY cell replacement:
- Lithium cell mismatches cause imbalance and potentially dangerous heating
- Spot welding is required for proper cell-to-cell connections; soldering lithium cells carries fire risk
- The BMS may not accept new cells with different internal resistance profiles
- Ryobi's warranty is voided (though it's likely already expired if you're doing this)
- If you don't know your exact cell arrangement and BMS configuration, you can create a genuinely dangerous pack
The community consensus, roughly: if you're comfortable with basic electronics and have a cell spot welder, it's worth attempting on a pack that's otherwise heading to recycling. If you're not, the risk-reward calculation doesn't favor opening it.
A thread on GitHub-adjacent battery rebuilding forums (specifically the "18650 Battery Club" community) documented at least three cases where improperly rebuilt Ryobi-style packs caused charger damage and, in one case, a minor fire from an overcharged mismatched cell. These are outliers, but they're real.
When the Charger Is the Problem
Don't assume the battery is always the culprit. Ryobi chargers fail too, and they often fail silently.
Known charger failure modes:
- Failed charging MOSFET: The charger powers on (green light) but cannot deliver current. Battery shows voltage on a multimeter but never charges.
- Bad thermistor circuit: The charger's temperature sensing circuit interprets normal temperatures as out-of-range, perpetually blocking charge
- Firmware lockout (yes, really): Some users have reported that certain Ryobi charger generations develop a persistent fault state that prevents charging even after the triggering condition (like a bad battery being connected) is resolved. Power cycling the charger (unplug for 30+ seconds) sometimes clears this.
- Physical contact wear: As described earlier, spring tension loss in the charger contacts
Testing the charger: If you have access to a second known-good Ryobi 40V battery, test the charger with it. If the known-good battery charges fine but your suspect battery doesn't, the battery is the problem. If neither charges, or the good battery charges intermittently, suspect the charger.
You can also test charger output voltage with a multimeter: with a battery seated, a functioning charger should show an elevated voltage across the battery terminals during charging (the charge voltage will typically be around 42V for a 40V pack at the end of charge).
Real Field Reports: What Actually Happens Out There
It's worth being honest about the pattern of failures that shows up repeatedly in community documentation, because it reveals something about both the product design and how people use it.
The "left in the shed" failure is, by far, the most common. Users who store batteries fully discharged through a winter almost universally encounter BMS lockout in the spring. Ryobi's own documentation says to store batteries at a "partial state of charge" and in a "cool, dry location" — guidance that appears in the manual but is rarely remembered, and never reinforced by the charger or any app notification system.
The "new charger broke the battery" confusion occurs when a user upgrades to a newer charger model and their older battery stops working. Ryobi has maintained broad cross-compatibility within the 40V platform, but there are known edge cases where older BMS firmware in certain battery generations doesn't communicate correctly with newer charger hardware. Ryobi's official position is that all 40V batteries and chargers are compatible. Users in specific forum threads (notably a long-running thread on the Ryobi Nation community forum titled "OP401 battery + OP406 charger = issues?") have documented consistent exceptions.
The "worked fine and then didn't" sudden failure is the genuinely concerning category. A battery that was charging normally, charged to completion, and then the next day shows a fault — with no obvious cause. In teardowns, this sometimes traces to a single cell that failed internally (short circuit or separator failure). The BMS detects the anomaly and locks the pack. In these cases, the pack is usually not recoverable through simple techniques and requires cell-level intervention.
Counter-Argument: Is the Ryobi 40V Platform Actually Reliable?
Here's where honest