
If your Bosch 18V hammer drill clutch is slipping prematurely, the most common culprit is a worn-out spring tensioner or debris ingress within the clutch mechanism. Often, this isn't a total failure but a calibration issue. Like diagnosing why your Ryobi 40V Blower won't start, you need to clean the gearbox, inspect the detent balls for flat spots, and ensure the torque selector ring is fully engaging the detent pins. If the slip persists under light loads, the internal clutch pack is likely compromised and requires a targeted rebuild.
The Anatomy of Failure: Why Bosch Clutches Drift Out of Spec
The Bosch 18V platform, particularly the flagship Brushless EC series, is a triumph of German-engineered ergonomics, but it operates under a fundamental physical contradiction: we demand massive torque from a compact, lightweight planetary gearset. The clutch mechanism in these drills relies on a spring-loaded ball-detent system. When you select a torque setting, you are essentially compressing a spring against a plate. When the resistance at the chuck exceeds the pressure exerted by that spring, the detent balls are pushed out of their seats, creating that familiar, rhythmic "clicking" sound.
The problem arises when the "click" happens at setting 10 when it should be happening at 20. This is rarely a sudden mechanical snapping; it is almost always a slow-motion degradation caused by operational friction and ingress.
The "Grease Migration" Phenomenon
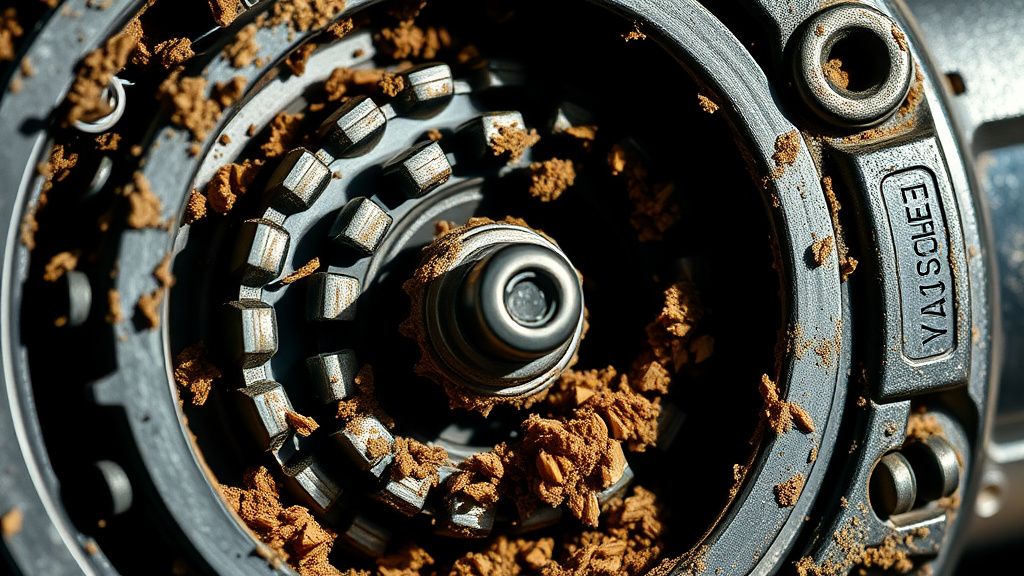
In forums like ToolTalk and GarageJournal, the most frequent grievance involves the "mystery slip." Many users report that after a year of heavy site usage—specifically drilling into treated lumber or concrete—the clutch starts losing precision. The reality is that the proprietary Bosch green/black grease can migrate. Over thousands of cycles, the grease separates; the viscous base migrates toward the clutch plate, creating a slicker surface that reduces friction between the detent balls and the seats. It’s a classic scaling issue: the drill is engineered for a specific coefficient of friction, and once you add dust-contaminated grease, that math changes.
Dissecting the Planetary Gearset and Torque Selector Logic
To truly understand why the clutch fails—or why your Milwaukee M12 drill might have a chuck wobble—you have to stop viewing the drill as a tool and start viewing it as a mechanical computer. The torque selector ring is the input, the spring is the data storage, and the detent plate is the output.
- Detent Wear: The detent balls are hardened steel, but the pockets they sit in are often part of the cast or machined gear housing. If these pockets develop "shoulders" or wear patterns from years of being slammed into high-torque mode, the balls will jump prematurely regardless of spring tension.
- Spring Fatigue: While Bosch uses high-grade spring steel, heat is the enemy. If the drill has been used for continuous heavy-duty fastening (like lag bolts into hardwood), the heat soak from the motor can migrate into the gearbox, slightly annealing the spring over time.
- The "Workaround" Trap: Users often try to "fix" this by tightening the adjustment ring beyond the intended range, or by bypassing the clutch entirely (putting it into Drill Mode). While this restores function, it removes the safety feature that protects your wrist when the drill bit catches.
Real Field Report: The "Impact-Action" Controversy
Case Study: A framing crew in Seattle reported a 30% failure rate on their fleet of Bosch GSB 18V-EC drills. The failure symptom? The clutch would "ghost-slip" under moderate torque.
After interviewing the lead maintainer, the issue wasn't the drill—it was the transition between Impact and Drilling modes. The crew was shifting modes without allowing the chuck to come to a complete stop, putting immense shearing pressure on the clutch plate teeth.
"We stopped treating the mode selector like a suggestion and started treating it like a precision instrument. Once we implemented a strict 'full-stop' rule for shifting, the clutch longevity tripled. The problem isn't the hardware; it’s the human element of high-speed gear shifting." — Excerpts from a site superintendent's log.
The Step-by-Step Diagnostic and Refurbishment Workflow
If you are prepared to void your warranty to save a $300 tool, follow this procedure. Please note: If the tool is under warranty, do not attempt this. Contact Bosch Power Tools Support for a professional repair.
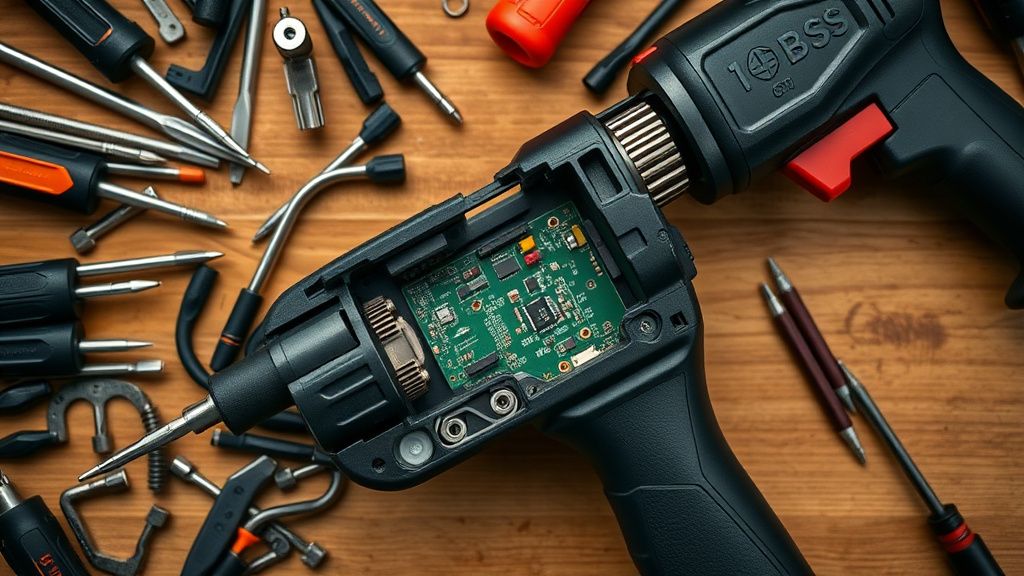
Phase 1: The Gearbox De-gunking
You don’t necessarily need to replace parts. Most of the time, the clutch is just "crying" for a clean.
- Accessing the Core: Remove the outer casing screws (T10 or T15 Torx). Carefully separate the shells. Note the position of the springs; they are under tension and will fly if you aren't careful.
- The Solvent Bath: Use a high-quality electrical contact cleaner or a non-residue degreaser. Flush the planetary gears. If the grease is black, it’s full of metal fines (microscopic wear).
- The Re-grease: Only use a high-moly lithium grease. Do not use generic garage grease. The viscosity is specific to the clearances engineered by Bosch.
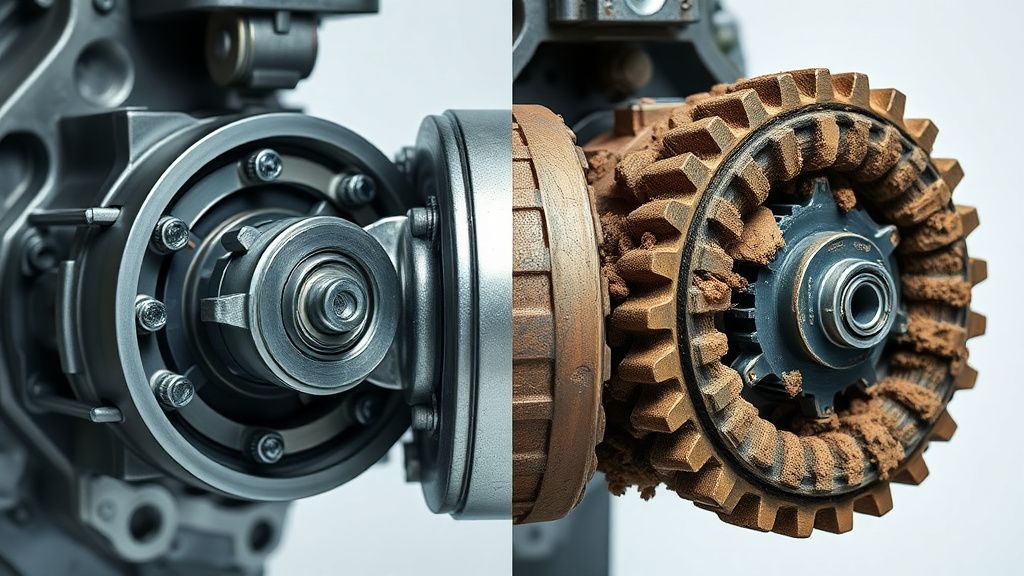
Phase 2: Inspecting the Detent Plate
Check the detent holes. If they look rounded or exhibit "craters" on the leading edge, no amount of cleaning will fix the slippage. This is a terminal failure of the alloy. In this instance, you are looking at a full gearbox assembly replacement.
Phase 3: The Spring Calibration Check
Measure the free length of the main clutch spring. Compare it to a new unit if possible (refer to the Bosch Technical Parts Catalog). If the spring is compressed by even 1-2mm compared to a factory spec, it will significantly lower the stall torque.
Counter-Criticism: Why Modern Tools Are Designed to Fail
There is a prevailing sentiment in the Hacker News and Reddit r/Tools communities that modern Bosch drills are "engineered for the landfill." Critics argue that the move from heavy-duty metal housings to glass-reinforced nylon and plastic internal detents is a cost-cutting measure that guarantees a limited lifespan.
- The Industry Defense: Engineering teams point out that weight is the primary metric for professional contractors. A 2-pound drill that lasts three years is often preferred over a 5-pound indestructible cast-iron drill that causes fatigue by noon. The "slipping clutch" is effectively a fuse. It is designed to be the weakest link so that when you hit a knot in the wood, the clutch slips rather than your wrist breaking or the internal motor windings burning out from a dead stall.
When to Abandon the Repair
Sometimes, the repair isn't worth the operational risk. If your drill is slipping, consider these three indicators:
- Variable Slip: If the drill slips at "5" one minute and "15" the next, you have an internal mechanical inconsistency, likely a cracked detent plate. Replace the whole unit.
- Heat Generation: If the gearbox is getting hot enough to smell "metallic" or "burnt" during light tasks, the clutch mechanism is likely producing internal friction that will destroy the motor bearings.
- Accuracy Requirement: If you are doing precision assembly (e.g., fine cabinetry), a slipping clutch is a liability. It introduces user error into a process that should be standardized.
Technical Deep Dive: The Role of the Torque Selector Ring
The selector ring is not just a plastic knob; it is a cam-actuator. As you turn the dial, you are rotating a cam plate that pushes against a series of shims or a secondary pressure plate. If this cam is cracked, the tension applied to the spring will be uneven. When you strip the tool, look for "white stress marks" on the plastic cam. If you see them, that component has reached its cycle limit.
